

Balcony Leak Inspection in Melbourne (Complete Guide 2026)
Melbourne’s unpredictable climate—intense heat cycles, heavy rainfall, and constant temperature fluctuations—creates the perfect storm for balcony leaks. What starts as a small moisture problem beneath your tiles can quietly escalate into structural damage, mould growth, and repair bills reaching tens ofthousands ofdollars.
The problem is that most people don’t realize their balcony is leaking until water appears on the ceiling below. By that point, the waterproofing membrane has already failed, water is actively migrating through the structure, and the damage is well underway.
This guide walks you through everything you need to know about professional balcony leak inspections in Melbourne—why they matter, what to look for, how modern detection technology works, and what a proper repair actually involves. Whether you own a single apartment or manage a body corporate with dozens ofbalconies, this resource will help you understand the inspection process and make informed decisions about your property’s protection.
Why Balcony Leak Inspections Matter in Melbourne
The Cost ofIgnoring a Leak
A leaking balcony isn’t like a leaking tap. You can’t just turn it offand fix it later. Water is actively damaging your building’s structural elements 24/7, and that damage is happening where you can’t see it.
During our inspections across Melbourne, we regularly uncover silent water damage that’s been progressing for 2–3 years before the first visible ceiling stain appears. By that stage, the repair costs have often tripled compared to what they would have been ifcaught early.
Here’s what happens:
- Structural decay: Moisture saturating timber joists and steel bearers causes rot and corrosion
- Concrete cancer: Water reaching the steel reinforcement inside concrete causes it to expand and fracture the slab from within
- Interior damage: Ceilings, plasterboard, and flooring below deteriorate rapidly
- Mould growth: Damp cavities become ideal breeding grounds for toxic mould that poses genuine health risks
The Melbourne weather makes this worse. Our hot, dry summers cause tiles and concrete to expand, stressing the waterproofing membrane. Then winter rain drives water directly into those stress fractures. This annual cycle is brutal on balcony membranes, and by year 10–15, failure is almost inevitable without professional intervention.
Why Standard Maintenance Fails
Many homeowners and strata managers believe regular regrouting is sufficient to keep a balcony dry. It’s not.
Here’s the reality: grout is only the top layer. The actual waterproofing happens in the membrane beneath the tiles. Once that membrane fails—and Melbourne’s climate makes that failure inevitable—no amount ofregrouting will stop the leak.
We’ve inspected hundreds ofbalconies that were regrouted every 3–5 years and still leaked continuously. The homeowners thought they were maintaining their balcony. In reality, they were just addressing the symptoms while the underlying waterproofing system quietly failed.
A proper balcony leak inspection identifies whether the real problem is the grout, the membrane, the drainage, or a combination of factors. That’s where professional diagnosis becomes essential.
Common Causes of Balcony Leaks in Melbourne
Understanding what causes leaks helps explain why catching them early is so critical. Most balcony leaks fall into a handful ofcategories.
Failed or Degraded Waterproofing Membranes
The waterproofing membrane is the invisible barrier beneath your tiles that stops water from entering the structure. When we inspect balconies using thermal imaging, we often see distinct patterns where the membrane has lost integrity.
During a recent inspection, our thermal camera clearly showed temperature variations across the balcony surface—cooler patches indicating where moisture was present beneath what looked like perfectly fine tiles from above. Only by removing the tiles did the failure become obvious: the membrane had cracked under building movement, and water was pooling directly on the concrete substrate.
This is why visual inspection alone is insufficient. A membrane can fail completely while the tiles above remain intact and unblemished. You need thermal imaging, moisture mapping, or dye tracing to see what’s actually happening beneath the surface.
Poor Drainage and Water Pooling
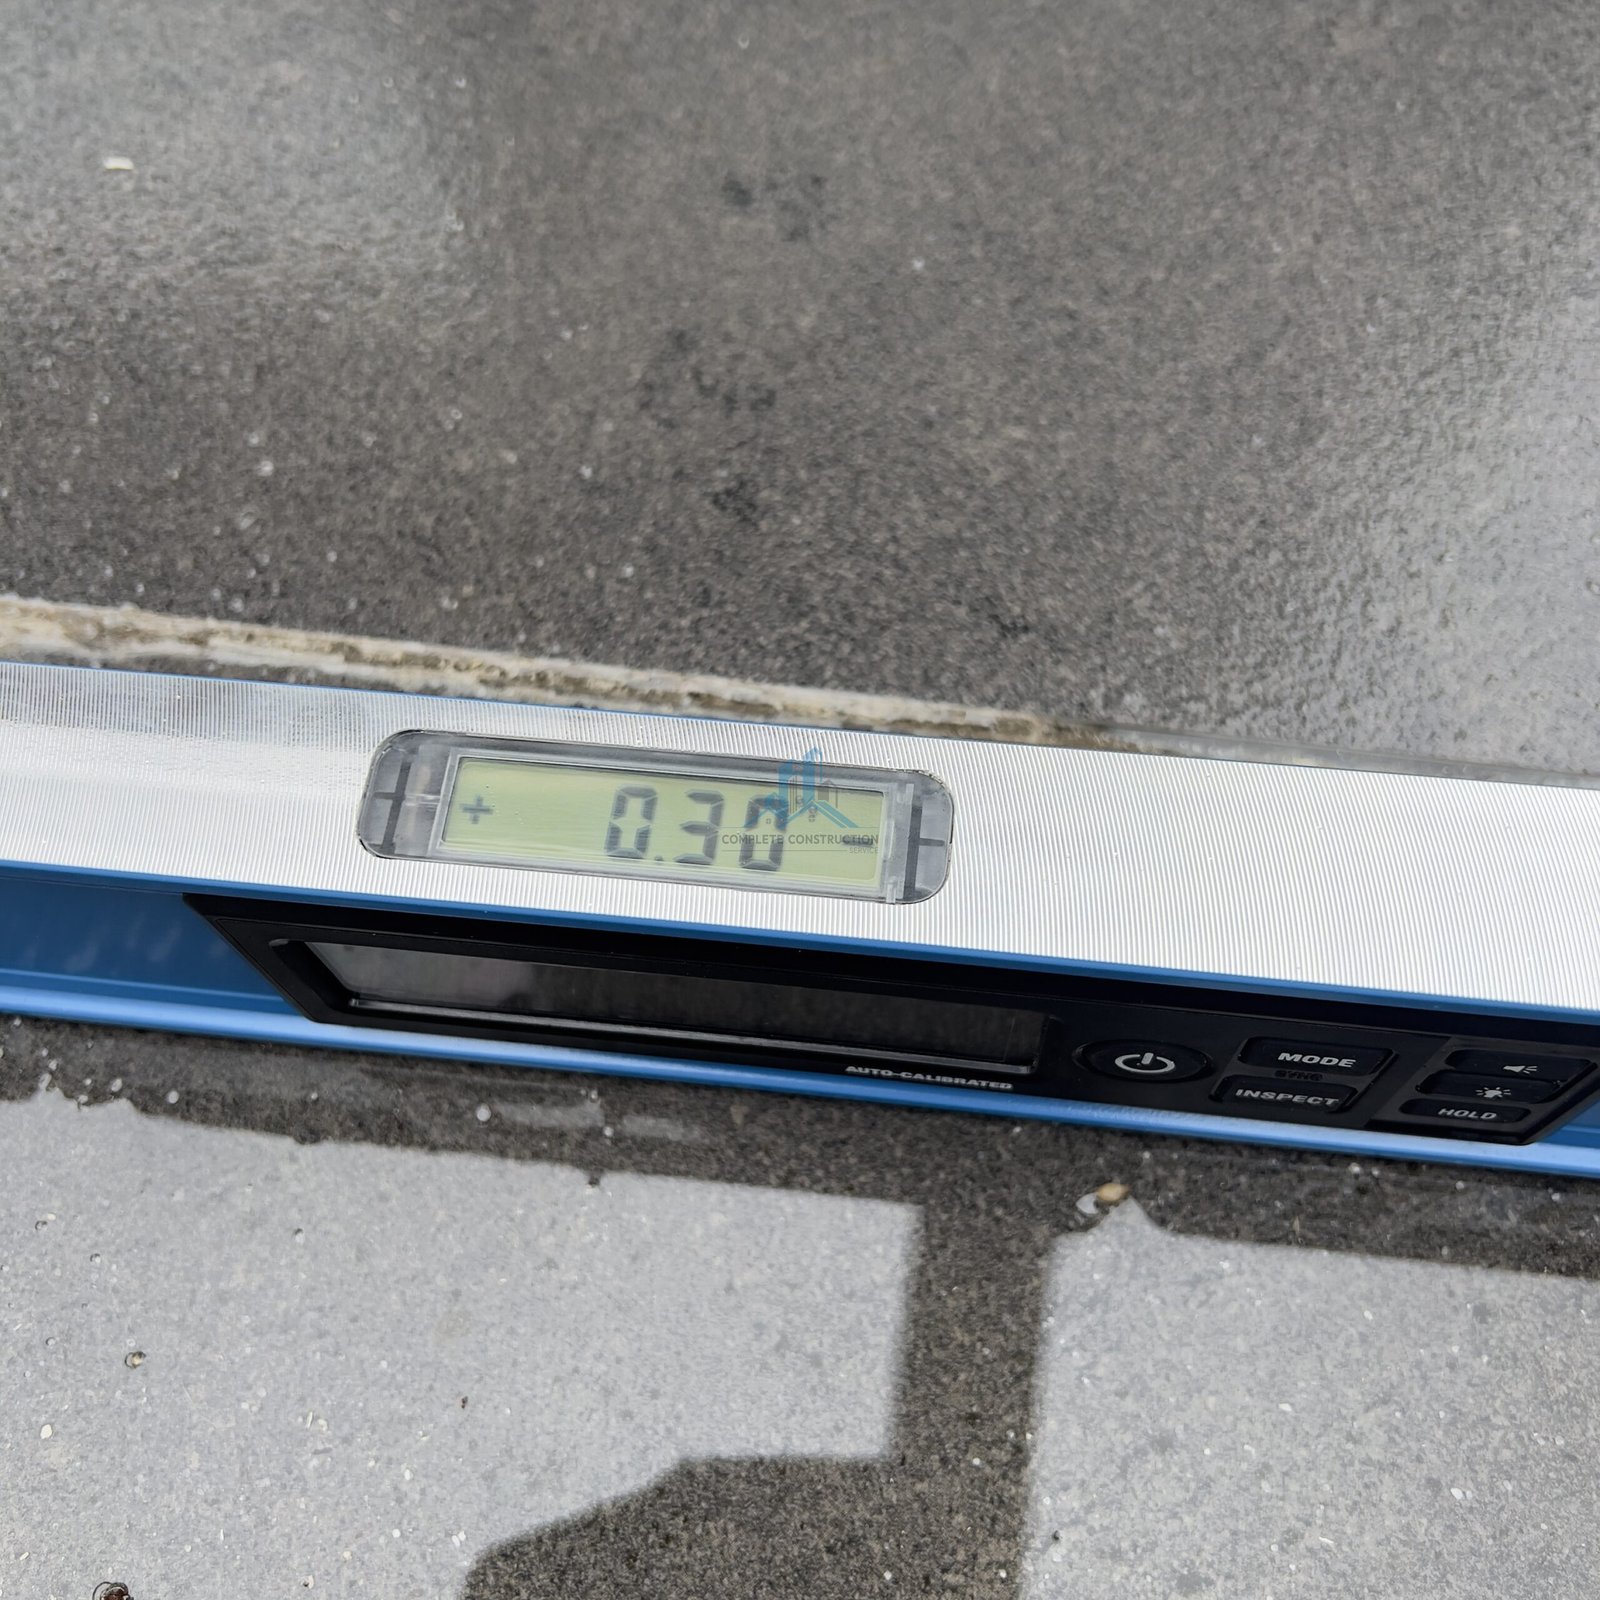
A balcony should slope gently toward the drain so water flows away rapidly. Ifthe drainage fall is inadequate—even by just 1–2 degrees—water pools on the surface instead ofdraining, creating extended contact between water and the tiles or membrane.
In our inspections, we’ve found balconies where the concrete has settled unevenly, reversing the drainage fall so water actually pools in the middle ofthe balcony rather than draining. Homeowners described water sitting on their balcony for hours after rain, even though they couldn’t see any obvious pooling. Thermal imaging revealed the truth: water was collecting in depressions invisible to the naked eye, sitting there long enough to penetrate the membrane.
Fixing drainage requires re-screeding the balcony to the correct fall—usually 1 in 50 to 1 in 80. This is a fundamental part ofany proper leak repair, and it’s often overlooked by tradies cutting corners.
Failed Perimeter Flashings and Sealants
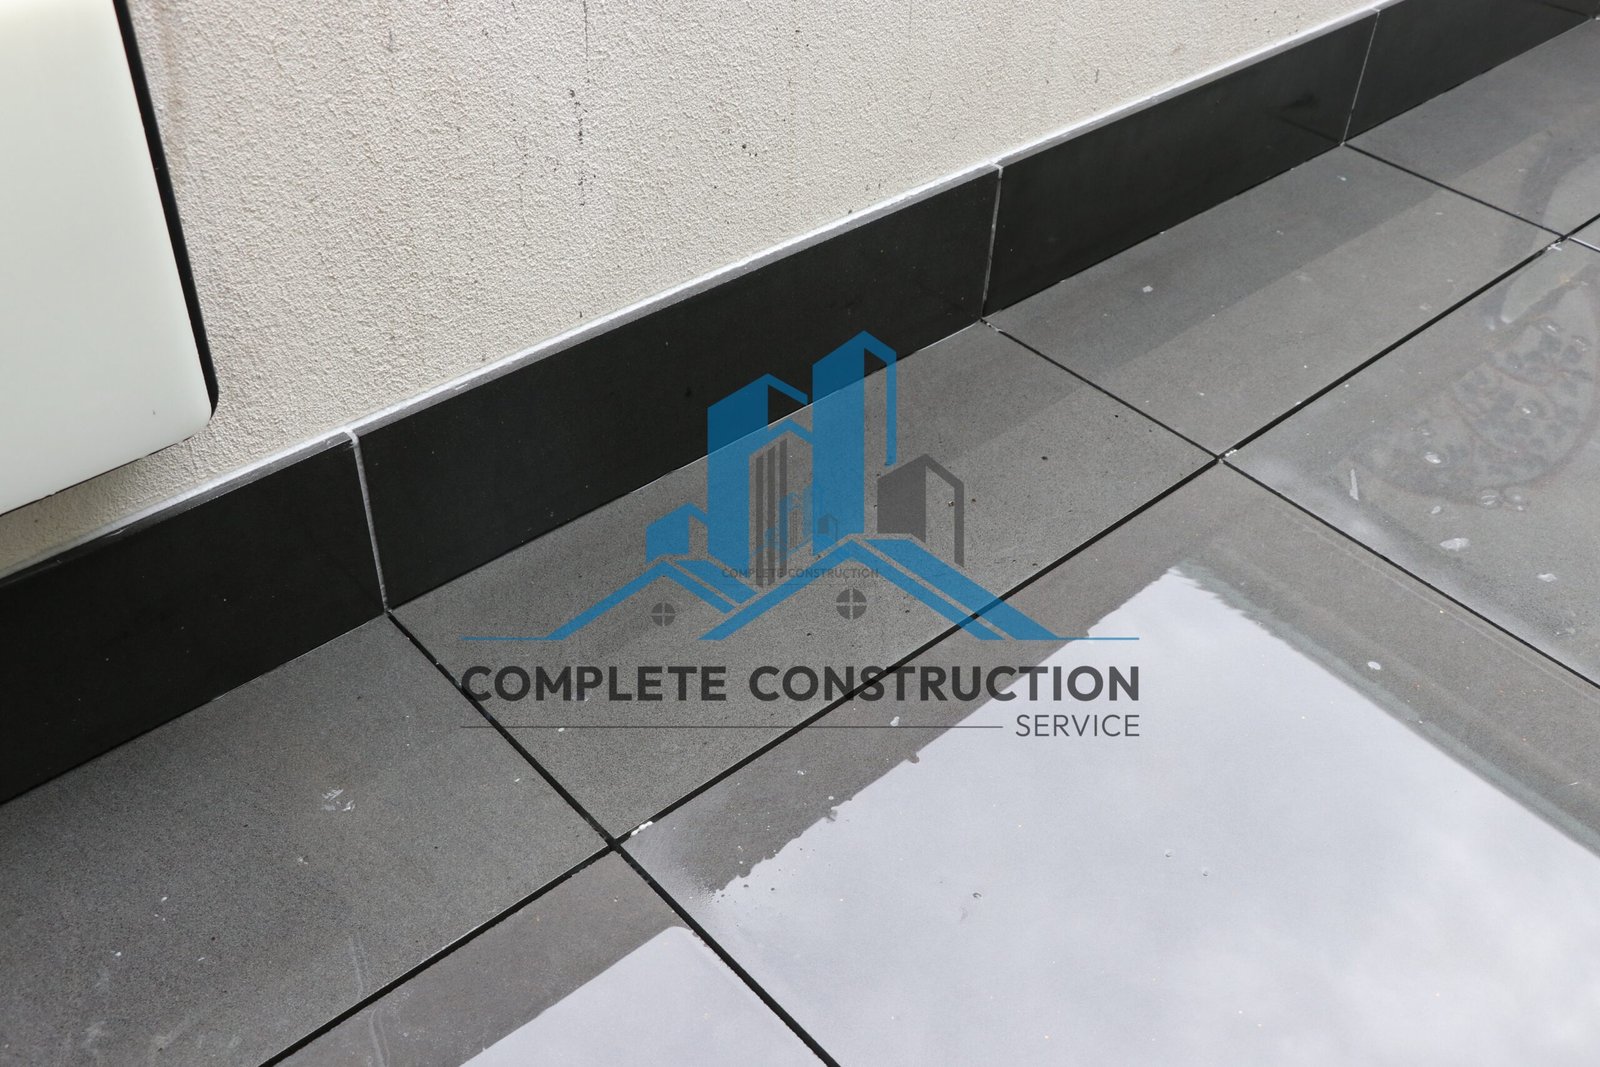
The edges where your balcony meets the building wall are high-risk zones. Water running offthe wall, from condensation, or from wind-driven rain hits that junction and looks for a way in. Ifthe flashing (the metal or membrane detail that bridges the wall-to-balcony junction) is corroded, missing, or poorly sealed, water flows directly underneath.
During inspections, we regularly find deteriorated sealants at the perimeter—sometimes nothing more than a thin bead ofcaulk that’s cracked, shrunken, or pulling away from the wall. That’s the direct entry point for water. Melbourne’s temperature swings cause sealants to shrink and expand constantly, and eventually they fail.
Building Movement and Structural Settlement
New buildings move. Older buildings move more. As a structure settles over time—especially in the first 5–10 years—it creates microscopic movement that stresses the waterproofing system. Ifthe membrane isn’t flexible enough to accommodate that movement, it cracks.
We’ve inspected balconies on buildings just 8–10 years old where the membrane has already begun failing because the building’s natural settlement stressed an insufficiently flexible waterproofing system. Proper membrane selection and application technique matters enormously.
Tile Movement and Cracked Grout
Cracked or missing grout is often a symptom rather than the cause. When grout cracks, it’s usually because the tiles beneath it are moving slightly due to building settlement or structural deflection. That movement indicates a deeper problem: either the substrate isn’t stable, the adhesive isn’t performing, or there’s moisture pressure from below pushing the tiles up.
Simply regrouting without addressing the underlying cause means the grout will crack again within months.
Warning Signs: What to Look For on Your Balcony
Ifyou notice any ofthese signs, your balcony may already be leaking. The earlier you arrange a professional inspection, the less damage will have occurred.
Water Stains or Damp Patches on the Ceiling Below
This is the most obvious—and one ofthe latest—warning signs. When water stains appear on the ceiling or plasterboard beneath your balcony, the leak has been active for quite some time. Water doesn’t just suddenly appear; it’s been gradually penetrating the slab, working its way through the structure, and finding its way to the interior.
Ifyou see this sign, don’t wait. Contact a professional immediately. The longer you leave it, the more structural damage occurs.
Tiles That Sound Hollow When Tapped
Take a timber mallet or even your knuckles and tap systematically across your balcony tiles. Tiles that sound hollow or “drummy” rather than solid typically indicate that water has got underneath and weakened or dissolved the adhesive bond. This creates an air gap between the tile and substrate.
During our inspections, this simple test often reveals problem areas before any visible staining appears. A few hollow-sounding tiles over the drain might indicate localized moisture; hollow tiles across a wide area suggests the membrane has failed more broadly.
White Chalky Deposits on Tiles or Concrete (Efflorescence)
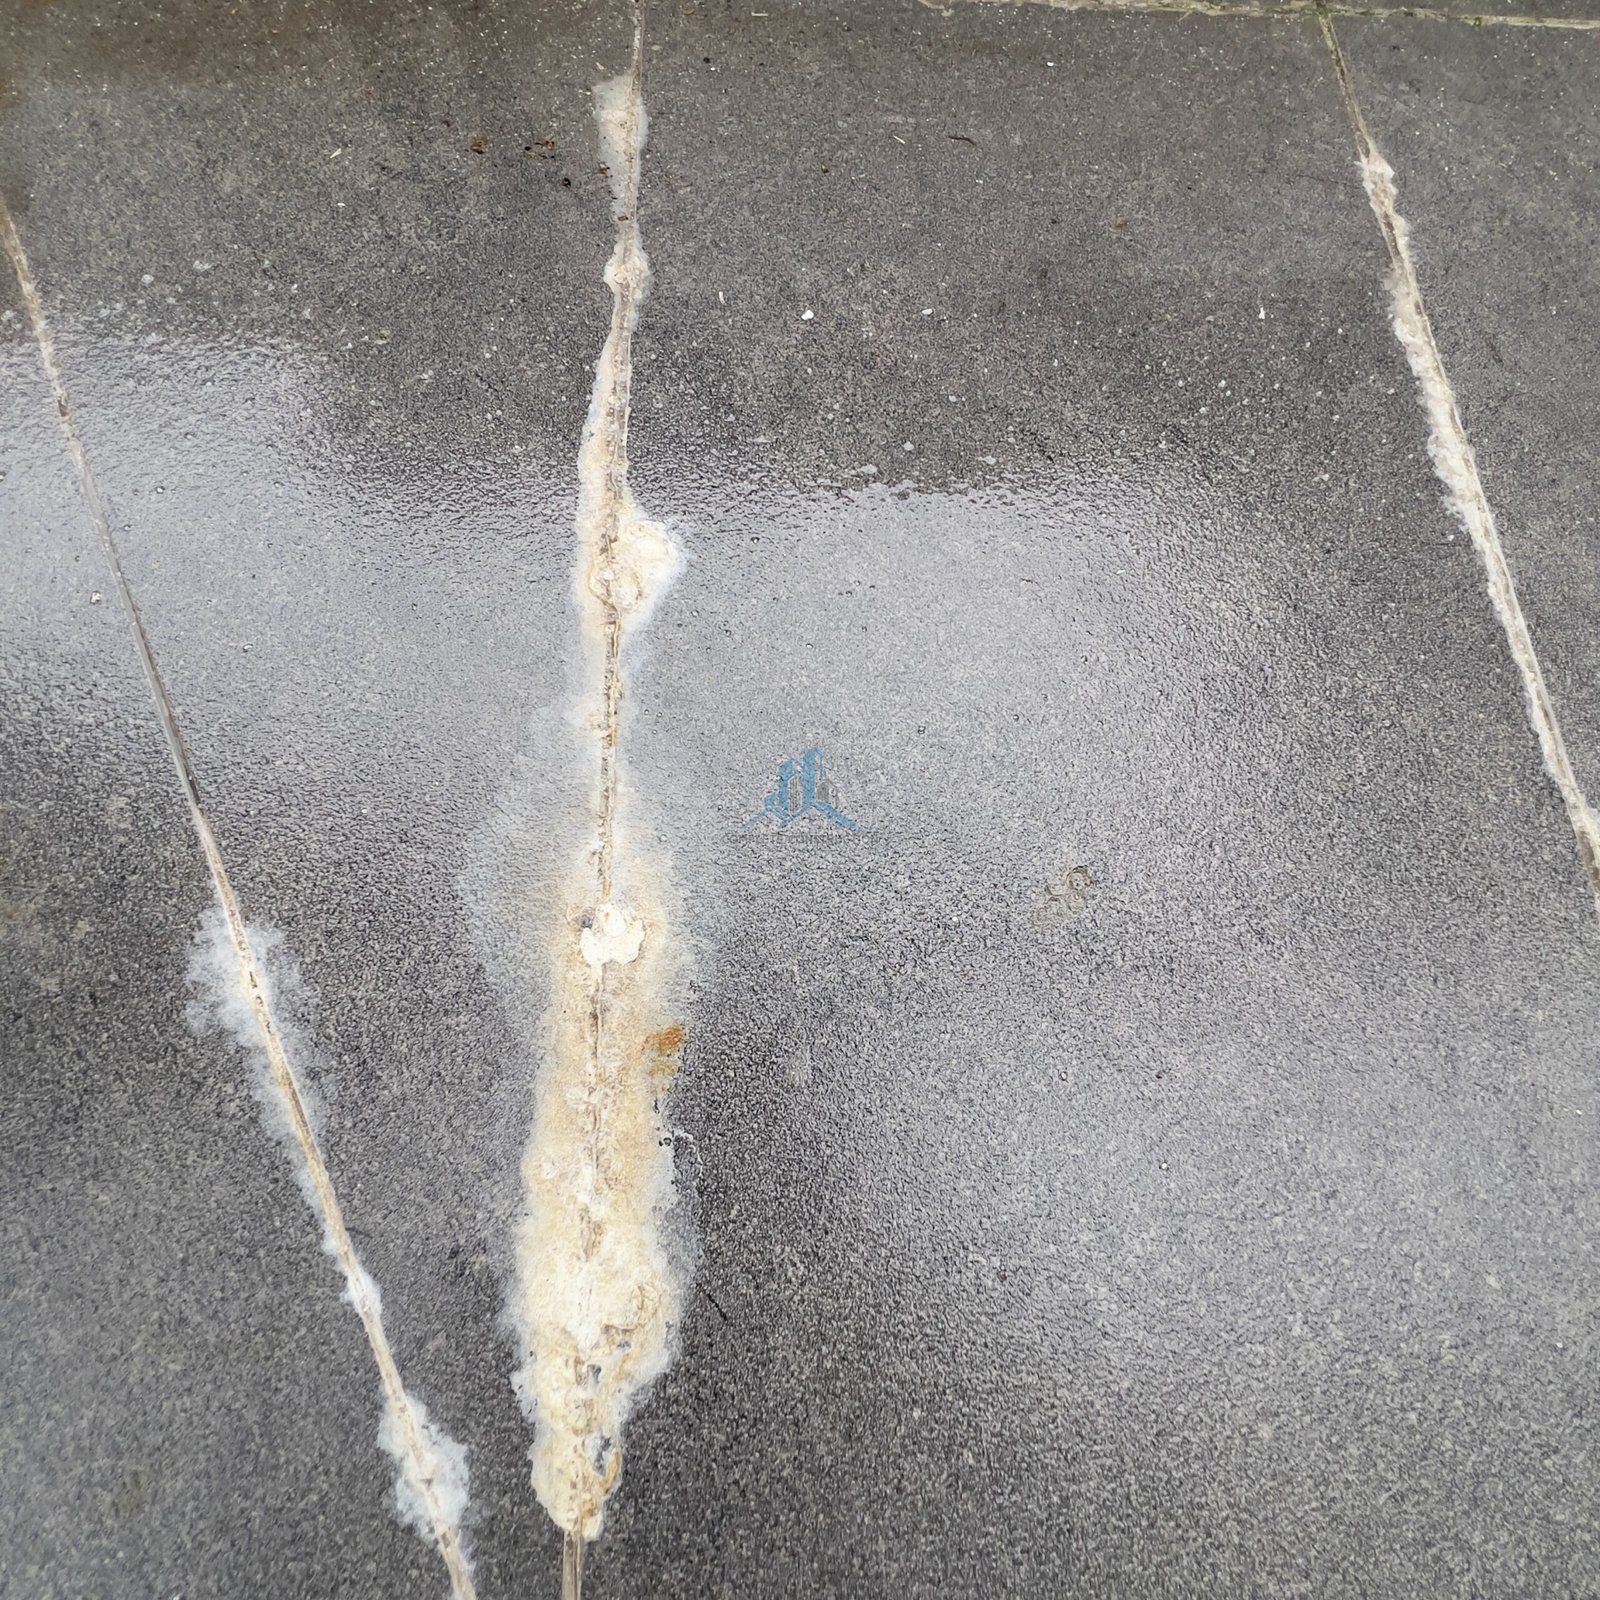
See whitish, powdery stains on your balcony tiles or the concrete edges? That’s efflorescence—mineral salts being carried out ofthe concrete by water migrating through the structure. It’s a clear visual signal that moisture is actively moving through the slab.
Efflorescence isn’t just a cosmetic issue. It’s evidence that your waterproofing has failed and water is actively transporting through the structure. In our inspections, we’ve used efflorescence patterns to map moisture pathways across balconies, helping identify exactly where water is entering.
Cracked or Missing Grout at the Perimeter
Any gap between your balcony tiles and the building wall is a direct entry point for water. In Melbourne’s climate—especially during heavy rain or when wind-driven rain hits the wall
—water will find its way through any crack or missing section ofperimeter grout.
Check the grout line where your balcony meets the wall. Ifit’s cracked, missing, or pulling away, water is getting in. This should be treated as urgent.
Musty or Damp Smell Near Balcony Doors
A persistent musty odour near balcony doors usually indicates mould growing in the wall cavity or beneath the flooring. Mould only grows where moisture is present and it’s been present for an extended period. This smell indicates active mould growth, which poses health risks and signals that your waterproofing has failed.
Ifyou notice this smell, arrange an inspection immediately. Mould remediation often requires professional handling and should be done in conjunction with fixing the underlying water source.
The Professional Balcony Leak Inspection Process
Here’s what happens when Complete Construction Service inspects your Melbourne balcony. This four-stage approach ensures no guesswork and no missed damage.
Stage 1: Thermal Imaging and Infrared Assessment
Modern thermal cameras show what the naked eye cannot. Our Eco-V thermal imaging camera detects temperature variations across the balcony surface, revealing where moisture is present beneath the tiles.
Damp materials retain heat differently than dry ones. When we scan your balcony with a thermal camera, areas where water has penetrated show up as cooler zones in the thermal image. This lets us visually map moisture patterns and identify exactly where water is traveling—without removing a single tile.
During a recent inspection in a Melbourne apartment, the thermal image revealed a clear pattern ofmoisture concentrated in a specific area ofthe balcony. What appeared to be a uniform, dry surface from above was actually showing significant water presence beneath. The homeowner had no idea the leak was this localized. Once we identified the exact zone, repairs were focused and efficient.
The thermal report we provide includes full-color thermal imagery showing moisture distribution, temperature readings, and annotated problem areas. This documentation is invaluable for insurance claims and body corporate records.
Stage 2: Electronic Moisture Mapping
Thermal imaging shows us where moisture is; moisture meters tell us how much moisture is there and how deep it goes.
We use non-invasive electronic moisture meters to take precise readings ofthe substrate’s condition. By mapping moisture across the balcony surface, we can determine:
- Whether the moisture is localized to one area or widespread
- How deep the moisture has penetrated (surface only, or through the entire substrate)
- Whether moisture levels are increasing or stable
- Where water is pooling beneath the tiles
During inspections, we’ve identified balconies where moisture readings were offthe scale in the center ofthe slab, revealing that water was pooling there—invisible to thermal imaging or visual inspection—but very real when measured electronically.
This data guides decisions about repair scope. A localized moisture problem might require targeted membrane repair; widespread moisture suggests the entire waterproofing system has failed and needs replacement.
Stage 3: Hydrostatic Testing and Dye Tracing
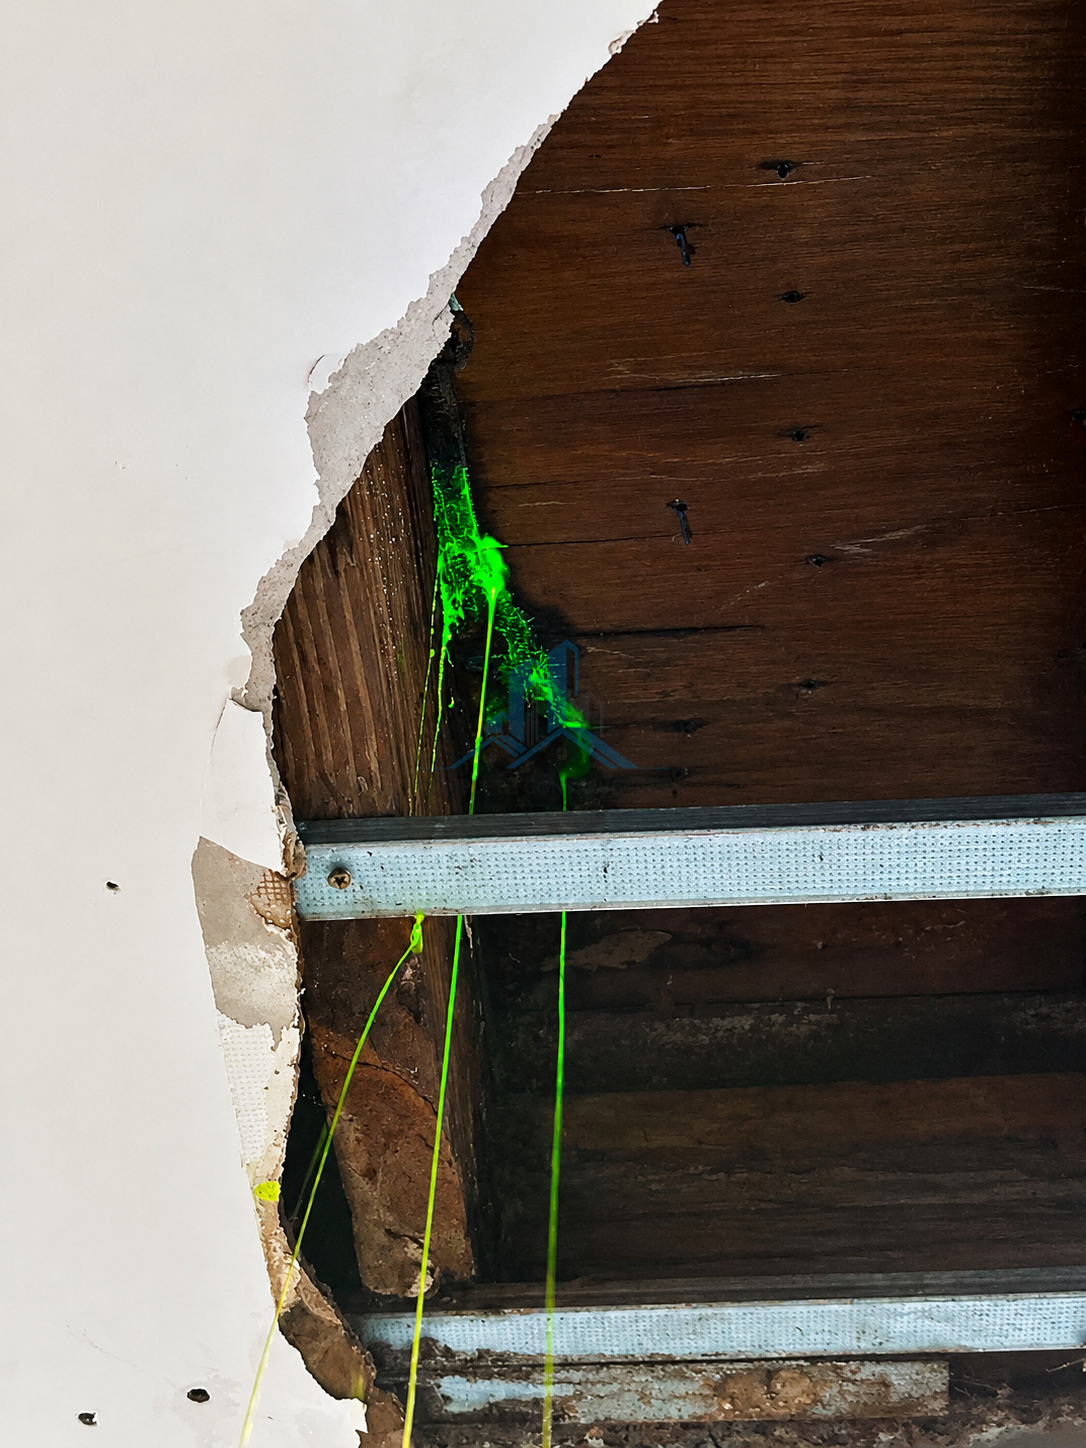
For complex leaks or situations where the entry point is difficult to pinpoint, we conduct controlled pressure testing combined with UV-fluorescent dye.
Here’s how it works: we simulate rainfall using controlled water pressure applied to the balcony surface, while simultaneously introducing UV-fluorescent dye into the water. This dye follows the exact path water takes as it travels through the structure. We then trace the dye using UV light to identify precisely where water exits—whether through a crack in the membrane, a failed flashing, or a drainage issue.
This test is particularly valuable for distinguishing between different failure types. Sometimes what appears to be a membrane failure is actually a plumbing leak; sometimes it’s a drainage problem; sometimes it’s all three. Dye testing reveals the exact mechanism so we can fix the right thing.
Stage 4: Comprehensive Digital Inspection Report
Every inspection results in a detailed digital report delivered within 48 hours. This report includes:
- Full thermal imaging with annotated moisture zones
- Moisture meter readings mapped across the balcony
- High-resolution photographs ofvisible failure points
- Visual observations ofgrout condition, tile movement, sealant integrity, and drainage
- Clear written summary offindings and severity assessment
- Preliminary repair recommendations
- Fixed-price repair quotation
This report is formatted for insurance submission and is suitable for body corporate records. It provides the documentation you need to prove the extent ofdamage and support any insurance claim.
What We Look for During Your Inspection
When our technicians inspect your balcony, we’re systematically assessing multiple systems. Here’s what gets checked.
Waterproofing Membrane Assessment
The membrane is the critical component. We assess:
- Membrane type – Is it a liquid membrane, sheet membrane, or torch-on membrane?
Is it appropriate for the climate and building type?
- Physical condition – Is it cracked, blistered, or peeling? Are there signs of UV degradation?
- Coverage – Has it been applied to all areas, including edges and junctions?
- Flexibility – Can it accommodate building movement, or is it rigid and prone to cracking?
During one inspection, the thermal imaging clearly showed the membrane had failed in a linear pattern—a stress crack running the width ofthe balcony where the building had settled unevenly. This wouldn’t have been visible from above, but the thermal signature was unmistakable.
Drainage System Evaluation
We check:
- Fall and slope – Does water run toward the drain, or does it pool?
- Drain condition – Is the floor waste clear and draining freely, or is it blocked?
- Outlet placement – Is the drain positioned at the low point ofthe balcony?
- Secondary drainage – Ifwater can’t reach the primary drain, where does it go?
A balcony we inspected in Prahran had its drain partially blocked by buildup, forcing water to pool in the center ofthe slab. The owners had no idea; they just noticed slow drainage after rain. The thermal image showed the water pooling exactly where the membrane was failing—the combination accelerating the damage.
Flashings and Sealant Inspection
Perimeter details are critical. We examine:
- Wall flashing condition – Is it properly sealed to the building wall? Is the metal corroded or damaged?
- Sealant integrity – Is perimeter sealant cracked, shrunken, or pulling away from surfaces?
- Movement joint quality – Are movement joints present where needed? Are they filled with the correct flexible sealant?
- Water entry points – Are there any obvious gaps where water could enter during rain or wind-driven spray?
In many Melbourne properties, we find perimeter sealant that’s been there for 15+ years with no maintenance. It’s cracked and shrunk, no longer providing any barrier. Water runs straight through.
Structural Condition Assessment
Water damage affects the structure beneath. We assess:
- Concrete condition – Are there cracks, spalling, or signs ofrust staining indicating steel corrosion?
- Timber deterioration – Ifthe balcony has timber joists or bearers, are they soft, rotted, or discoloured?
- Efflorescence patterns – White deposits on concrete surface edges indicating water migration
- Structural movement – Uneven tiles or visible cracks suggesting settlement or deflection
A balcony inspection in Richmond revealed concrete with significant spalling and rust staining—classic signs ofconcrete cancer. The embedded steel reinforcement had corroded and expanded, fracturing the concrete from within. This occurred because water had been penetrating the balcony for years before repairs began.
Tile and Grout Integrity
The surface finish tells a story. We check:
- Tile adhesion – Are tiles loose or hollow-sounding?
- Grout condition – Is grout cracked, missing, or disintegrating?
- Tile movement – Do tiles shift under pressure, or are they firmly bonded?
- Tile type – Is the tile suitable for external use? Some internal tiles are porous and don’t belong on balconies.
Understanding Your Inspection Results
After inspection, you’ll receive a report. Here’s how to read it.
Thermal Imaging Results
The thermal image shows temperature distribution across your balcony. Cooler areas (shown in blue or purple) indicate where moisture is present. Warmer areas (shown in red or yellow) indicate dry zones.
Look for patterns. A concentrated cool zone in one corner indicates localized moisture. A general cool haze across most ofthe balcony indicates widespread moisture. Moisture concentrated directly around the drain might indicate pooling. Moisture following the wall line suggests water entry from the perimeter.
Our technician will annotate the image to highlight key findings, but understanding the basic color pattern helps you grasp the severity.
Moisture Meter Readings
Moisture meters measure water content in the substrate as a percentage. Readings vary by material type:
- Below 15% – Normal, dry conditions
- 15–25% – Elevated moisture; investigation needed
- 25–40% – Significant moisture; waterproofing has likely failed
- Above 40% – Severe moisture; active water damage occurring
Ifreadings are consistently above 25%, the waterproofing system has failed and water is actively damaging the structure.
Grout and Sealant Assessment
The report documents the condition ofall grout and sealant. Ratings typically include:
- Good condition – Sound, no cracks, fully bonded
- Fair condition – Minor cracks or slight separation; functional but degrading
- Poor condition – Significant cracks, separation, or missing sections; no longer effective barrier
Poor-condition sealants should be scheduled for replacement as part ofrepair work.
Structural Damage Findings
Ifthe inspection reveals structural damage—cracked concrete, rust staining, timber deterioration—this gets documented with photographs and severity assessment. Structural
repairs are often more complex and costly than waterproofing repairs alone, but they’re essential to prevent further deterioration.
Repair Recommendations
Based on all findings, the report recommends specific repairs. These typically include:
- Membrane replacement – Full removal of failed membrane and application ofnew system
- Drainage correction – Re-screeding to correct fall and ensure water flows to drain
- Flashing replacement – Installation ofnew metal or membrane flashing at wall junctions
- Sealant renewal – Application ofnew perimeter sealant at building interface
- Tile replacement – Installation ofnew external-grade tiles using flexible adhesive
- Structural repair – Any necessary concrete, timber, or steel work
The Repair Process: From Detection to Completion
Once your inspection is complete and the problem is understood, the repair work can begin. Here’s exactly what happens.
Step 1: Strip Back and Full Assessment
The existing tiles, adhesive, and screed are carefully removed to expose the substrate. We photograph everything as the balcony is stripped back, documenting the extent ofdamage that wasn’t visible from above.
This stage often reveals more severe damage than the inspection indicated. Water has typically traveled farther beneath the surface than the thermal imaging showed. Once exposed, the true scope ofwork becomes clear.
During one complex job in a Prahran apartment, stripping back revealed that moisture and mould had penetrated into the wall cavity behind the balcony. What appeared to be a simple waterproofing failure was actually a complex issue involving cavity treatment and structural drying.
This stage takes 1–2 days depending on balcony size and complexity.
Step 2: Drainage and Structural Correction
The concrete substrate is assessed for damage. Any soft, spalled, or compromised concrete is removed and made good. Ifthere’s structural damage—cracked concrete, deteriorated steel—it’s repaired or reinforced now, before the new waterproofing system is installed.
Drainage is corrected. Ifthe original fall was inadequate, the balcony is re-screeded to the proper fall—typically 1 in 50 to 1 in 80—ensuring water flows cleanly toward the drain.
Floor wastes are repositioned ifnecessary to ensure they sit at the absolute low point.
Metal flashings are installed at all wall junctions and perimeter edges. These are the spots where most balcony leaks actually begin. The flashing bridges the gap between wall and balcony, directing water away from the junction.
This stage takes 2–3 days and is critical to long-term performance.
Step 3: Waterproofing Membrane Application
A multi-coat liquid waterproofing membrane is applied across the full balcony surface. The membrane is typically applied in 2–3 coats, with each coat allowed to fully cure before the next application.
We use exterior-grade, flexible membranes that can accommodate building movement. The membrane is applied to all horizontal surfaces, all vertical upstands, and all junctions. Every corner, every edge, every joint gets sealed.
The membrane is allowed to fully cure—typically 48–72 hours depending on weather and product type—before any further work proceeds. Rushing this step is a common cause of re-leaking; we never skip the cure time.
This stage takes 5–7 days depending on curing conditions.
Step 4: Screed to Correct Falls
New screed—a sand-cement or self-levelling compound—is applied over the cured membrane. The screed is laid precisely to the correct fall, engineered so water flows steadily toward the drain rather than pooling anywhere on the balcony.
Pooling is a common cause ofre-leaking after poorly executed repairs. Ifthe screed isn’t laid to proper fall, water sits on the surface, extends contact time with the membrane, and eventually finds any microscopic weakness.
This stage takes 2–3 days including cure time.
Step 5: External-Grade Tiling and Final Finish
External-grade tiles are installed using flexible, water-resistant adhesive. Installation follows strict procedures:
- Tiles are laid with consistent joint width (typically 3–5mm)
- Perimeter tiles are positioned with proper setbacks and clean edge transitions
- Grout is applied to all joints using flexible, waterproofgrout
- Perimeter sealant (not grout) is applied at the building wall interface—this critical junction uses sealant, not grout, because sealant can flex and accommodate movement
The balcony is left to cure for 48 hours before foot traffic resumes.
This final stage typically takes 3–4 days.
Total repair timeline for a standard balcony: 5–7 working days from start to finish, depending on size and damage complexity.
Why a Proper Repair Requires Removing Tiles
Some contractors suggest applying surface sealers over the top ofexisting tiles, avoiding the time and cost oftile removal. Don’t accept this approach.
Here’s why:
Surface sealers address only the symptom. They seal the grout and tile surface, making it hydrophobic. But ifthe waterproofing membrane beneath the tiles has failed, water is already getting in. A surface sealer won’t stop that.
They’re temporary fixes. Surface sealers degrade under UV exposure and foot traffic, typically lasting 12–24 months before requiring reapplication.
They often re-leak within months. We’ve inspected hundreds ofbalconies treated with surface sealers that started leaking again within 6–12 months. The homeowner paid for a “fix” that didn’t actually fix anything.
A proper repair removes tiles, replaces the failed membrane, corrects the drainage, and reinstalls tiles with flexible adhesive. It’s more disruptive and costly upfront, but it actually solves the problem. That’s why our repairs come with a 10-year warranty—because they’re designed to stay fixed.
Moisture Testing Technology: How It Works
Modern leak detection uses three main technologies. Understanding them helps you appreciate what’s happening during your inspection.
Thermal Imaging (Infrared Thermography)
Thermal cameras detect infrared radiation—heat—emitted from surfaces. All materials emit heat, but they emit it differently depending on their water content and density.
A dry concrete substrate and a water-saturated substrate at the same temperature will emit different amounts ofinfrared. The thermal camera sees this difference and displays it as a color gradient—blue for cooler (wet) areas, red for warmer (dry) areas.
Advantages:
- Non-invasive; no damage to the balcony
- Reveals patterns ofmoisture distribution
- Shows exact location ofpooling water
- Works through tiles without removal
- Provides visual documentation
Limitations:
- Only shows surface temperature; doesn’t measure absolute moisture content
- Affected by time ofday and weather (morning sun heats the surface differently than afternoon)
- Can’t distinguish between different causes ofcooling (moisture vs. shade vs. air current)
We always combine thermal imaging with other tests to confirm findings.
Electronic Moisture Meters
Moisture meters measure the electrical conductivity ofthe substrate. Water is conductive; dry material is not. By measuring conductivity, the meter estimates water content as a percentage.
Advantages:
- Provides quantitative moisture measurement
- Takes readings at different depths
- Quickly identifies problem areas
- Inexpensive and widely available
Limitations:
- Requires physical contact with the surface
- Readings vary by material type; concrete, tile, and timber have different calibrations
- Only measures moisture at the probe location; doesn’t show patterns
- Can’t determine the source ofmoisture
Moisture meters are excellent for confirming problem areas but shouldn’t be used alone.
Hydrostatic Testing and Dye Tracing
This is the gold standard for tracing leaks through complex paths. Water is applied under controlled pressure while fluorescent dye is introduced. The dye follows the exact path water takes as it travels through cracks, gaps, and failed membranes.
Using UV light, we trace where the dye appears—identifying the precise exit point ofwater.
Advantages:
- Reveals exact water pathways
- Identifies multiple leak points that might be missed by other methods
- Distinguishes between membrane failures, drainage issues, and plumbing leaks
- Provides definitive proofofthe leak mechanism
Limitations:
- More time-consuming than other tests
- Requires balcony to be wet; can’t be performed in certain weather
- Most relevant for complex leaks; overkill for straightforward failures
Moisture Issues in Melbourne‘s Climate
Melbourne’s weather creates specific challenges for balcony membranes.
Summer Heat and Expansion Stress
Melbourne summers reach 40°C+. Concrete expands significantly at these temperatures. If the waterproofing membrane isn’t flexible enough to accommodate this expansion, it develops stress cracks.
We’ve inspected balconies where the thermal image shows heat-stress cracks developing in a predictable grid pattern—the concrete expanding and contracting with the daily temperature cycle, stressing the membrane until it fractures.
This is why membrane flexibility is critical in Melbourne. A rigid epoxy coating might work in a stable climate; in Melbourne, it will crack under thermal stress.
Winter Rain and Hydrostatic Pressure
Melbourne winters bring heavy, sustained rain. When rain continues for days, hydrostatic pressure builds up beneath any failed waterproofing. This pressure actively pushes water deeper into the structure and toward any exit point.
We’ve documented cases where balconies that were marginally leaking suddenly leaked heavily during extended rain—not because the membrane got worse, but because hydrostatic pressure increased. The same failed membrane that might trickle water in light rain will flood in heavy rain.
Freeze-Thaw Cycles (Occasional)
While Melbourne doesn’t experience harsh freeze-thaw cycles like southern Australian states, occasional winter frosts do occur. Water in cracks and voids freezes, expands, and widens those cracks when it thaws. This gradual widening accelerates membrane failure over several freeze-thaw cycles.
Why Early Detection Saves Money
Early balcony leak detection is arguably the best investment you can make in your property’s longevity.
Cost Comparison: Early vs. Late Detection
Early Detection (Year 2–3):
- Waterproofing membrane has failed but structural damage is minimal
- Repair scope: membrane replacement, screed correction, retiling
- Estimated cost: $3,500–$6,000 for a standard apartment balcony
- Warranty: 10 years
Late Detection (Year 8–10):
- Membrane has failed, concrete is damaged, steel has corroded, timber has rotted
- Repair scope: membrane replacement, concrete repair/replacement, timber replacement, retiling, potential cavity treatment
- Estimated cost: $8,000–$15,000+ for the same balcony
- Warranty: 10 years (but more complexity means higher risk ofincomplete repair)
The difference in cost is often 50–100% higher when damage is left unchecked. Early detection and repair saves significant money.
Insurance and Body Corporate Liability
A documented inspection creates a record ofthe building’s condition at a specific point in time. This documentation is valuable if:
- An insurance claim is needed for water damage to interior spaces
- Body corporate liability is disputed between owners and management
- Building defect claims arise during construction warranty periods
Having thermal imaging and moisture mapping data from a professional inspection provides evidence ofwhen and where problems existed. This can be critical in resolving disputes.
FrequentlyAsked Questions
How Long Does a Balcony Leak Inspection Take?
A standard balcony leak inspection takes 1.5 to 3 hours depending on balcony size and complexity. The inspection includes thermal imaging, moisture mapping, visual assessment, and photography.
The resulting detailed report is delivered within 48 hours and includes full thermal imagery, annotated findings, and repair recommendations.
Can a Leaking Balcony Be Fixed Without Removing the Tiles?
In rare cases—when the failure is purely in the grout and the membrane is still intact—targeted regrouting might suffice. However, this is unusual.
Most balcony leaks involve membrane failure, drainage problems, or perimeter flashing failures. These can’t be addressed without removing tiles to access the membrane.
A “quick fix” surface sealer applied over existing tiles typically stops working within 6–12 months. Proper repair requires tile removal to address the underlying failure.
What’s Included in a Written Repair Quotation?
After inspection, we provide a detailed quotation including:
- Scope ofwork (what will be removed, repaired, replaced)
- Materials to be used (membrane type, tile type, grout type)
- Timeline (how many working days the repair will take)
- Fixed price (no variations unless you request additional work)
- Warranty terms (10-year written waterproofing warranty)
The quotation is binding. The price we quote is the price you pay.
Do I Need a Separate Quote from a Structural Engineer?
Ifthe inspection reveals structural damage—cracked concrete, rust staining indicating steel corrosion, or timber deterioration—we recommend obtaining a structural engineer’s assessment before repair begins.
Structural damage might indicate that the concrete slab itselfis at risk, which could affect repair strategy. A structural engineer’s report ensures the repair approach is appropriate for the building’s condition.
For straightforward membrane failures with no obvious structural damage, a structural report isn’t necessary.
What’s the Warranty Coverage?
Our 10-year waterproofing warranty covers the waterproofing system we’ve installed. If water penetrates the waterproofed area within 10 years due to membrane failure, we return and fix it at no charge.
The warranty doesn’t cover:
- Structural damage that existed before repair
- Damage from building settlement beyond what the flexible membrane can accommodate
- Damage from defects in the original building structure
- Normal wear and tear ofgrout or sealant (these are maintenance items)
All warranty terms are detailed in the written certificate provided when the job is complete.
Can You Repair a Balcony in a Strata Building?
Yes. We regularly repair balconies in apartment buildings and strata schemes across Melbourne. We:
- Work with body corporates and owners corporations to coordinate access
- Manage resident notification and building access procedures
- Complete repairs on schedule with minimal disruption
- Handle both single-balcony repairs and multi-unit remediation projects
- Provide documentation suitable for body corporate records and insurance claims
Body corporate repairs often qualify for special levy or maintenance fund funding, and we can provide reports and quotations formatted for body corporate approval.
How Often Should I Inspect My Balcony?
For a balcony over 10 years old, we recommend inspection every 2–3 years, particularly if you’ve noticed any warning signs.
For a newer balcony (under 5 years old) with no visible issues, annual visual checks by the owner plus a professional inspection at year 5 is reasonable.
Ifyou’ve had repairs done and have a warranty, stick to the inspection schedule recommended at completion.
What Happens if My Balcony Leaks Again After Repair?
That’s covered by our warranty. Ifthe waterproofed area leaks within 10 years, contact us.
We’ll investigate and repair at no charge.
In practice, this is rare. Properly executed repairs using flexible membrane, correct drainage, and quality flashing typically outperform their warranty period by years. But if something does go wrong, that’s what the warranty is for.
Can Thermal Imaging Detect Leaks Under Carpets or Soft Furnishings?
Yes, thermal imaging will detect moisture through soft materials. However, ifyour balcony is furnished, please clear furniture, plants, and storage items before inspection. This ensures clear access to the entire balcony surface and accurate thermal imaging.
Maintenance After Repair: Keeping Your Balcony Dry
A properly repaired balcony should remain waterproof for years without maintenance.
However, simple care extends its life.
Annual Visual Checks
Once a year (typically after Melbourne’s winter rain), inspect your balcony for:
- Cracks in grout or sealant
- Loose or hollow-sounding tiles
- Water pooling on the surface
- Visible damage to perimeter sealant
Early detection ofsmall issues prevents them from becoming major problems.
Perimeter Sealant Maintenance
The sealant around the building wall interface is the most wear-prone element. It’s exposed to temperature swings and UV radiation. Check it annually and plan for re-sealing every 5–7 years.
When sealant begins to crack or separate from the wall, schedule renewal. This is inexpensive preventative maintenance that stops water entry at the most critical junction.
Drain Maintenance
Keep the balcony drain clear. Debris, leaves, and buildup reduce drainage efficiency. A simple rinse with the hose and removal ofany debris ensures water flows freely after rain.
Ifdrainage seems slow or water sits on the balcony after rain, the drain may need professional cleaning.
Avoid Damage During Cleaning
When cleaning your balcony, avoid high-pressure washers that can damage grout and sealant. A soft brush and mild detergent are sufficient. Pressure washing should be left to professionals who know how to adjust pressure appropriately.
Conclusion: Taking Action
A leaking balcony isn’t a minor inconvenience. It’s active, progressive damage to your building’s structure. The longer you leave it, the more expensive the eventual repair becomes.
Ifyou’ve noticed any warning signs—water stains on the ceiling below, damp smells, hollow tiles, efflorescence deposits, or cracked perimeter sealant—your balcony needs professional inspection. The cost ofan inspection is tiny compared to the cost ofignoring a leak and facing major structural repairs later.
Complete Construction Service has inspected and repaired hundreds of Melbourne balconies. We use modern detection technology (thermal imaging, moisture mapping, hydrostatic testing) to identify exactly what’s wrong before any repair work begins. We then execute repairs properly, using flexible membranes, correct drainage, quality flashings, and skilled installation. And we back every job with a written 10-year waterproofing warranty.
Your Melbourne home deserves protection from the climate. A professional balcony leak inspection is the first step.
Ready to Get Started?
Book your free balcony leak inspection today.
Our inspection process takes 1.5 to 3 hours and includes thermal imaging, moisture mapping, and a detailed report with findings and repair recommendations.
We’re available across all Melbourne suburbs—from Cranbourne and Pakenham in the outer south-east, through the inner suburbs, to Box Hill and Glen Waverley in the eastern zone.
Call us: 1300 221 476
Email: office@completeconstructionservice.com.au
Hours: 8:00 AM – 5:00 PM, Monday to Friday
Or fill out our online contact form at completeconstructionservice.com.au/contact-us to request a site visit.
We’ll arrange a time that suits you, conduct a thorough inspection, and provide a detailed report and fixed-price quotation within 48 hours. No surprises, no hidden costs—just honest assessment and expert repair.
Don’t wait until water appears on the ceiling below. Get ahead ofthe problem. Book your inspection this week.
About Complete Construction Service
Complete Construction Service is a Melbourne-based construction company specialising in balcony leak repair, waterproofing, tiling, and rendering. Since 2019, we’ve completed hundreds ofprojects across Melbourne, working with homeowners, apartment owners, body corporates, and insurers.
We employ over 30 licensed professionals including waterproofing specialists, tilers, concreters, and renderers—all working in-house. We don’t use subcontractors, so you work directly with our experienced team from start to finish.
Every balcony repair is backed by a written 10-year waterproofing warranty. We pride ourselves on fixed-price quotations, honest communication, and work that lasts.
Licensed and Insured
ABN: 14 662 887 747